Unlock Your Pi: Seamless Remote Access Over The Internet
In today's interconnected world, the ability to control and interact with your devices from anywhere is not just a luxury, but often a necessity. For enthusiasts and professionals alike, the Raspberry Pi, a versatile and compact single-board computer, offers endless possibilities. However, to truly unleash its potential, mastering how to communicate with your Raspberry Pi over the internet is paramount. Imagine managing your home automation, monitoring a remote sensor, or even developing code on your Pi from a coffee shop thousands of miles away.
This comprehensive guide will demystify the process, exploring a range of methods from the simplest local connections to advanced, secure internet access solutions. We'll delve into the fundamental concepts, walk you through various techniques, and crucially, emphasize the importance of security, ensuring your remote setup is both functional and protected. Whether you're a beginner taking your first steps into remote computing or an experienced user looking for more robust solutions, this article is designed to provide you with the knowledge to connect to your Raspberry Pi remotely with confidence.
Table of Contents
- The Allure of Remote Pi Access: Why Connect Remotely?
- Fundamental Concepts for Internet Communication
- Direct & Local Network Connections: The Starting Point
- Securely Communicating with Your Raspberry Pi Over the Internet
- Leveraging VPNs for Enhanced Security
- Cloud-Based & Third-Party Remote Access Solutions
- Advanced Network Configurations & Considerations
- Implementing Robust Security Measures
The Allure of Remote Pi Access: Why Connect Remotely?
The Raspberry Pi, with its compact size and low power consumption, is an ideal candidate for projects that require continuous operation or placement in hard-to-reach locations. But what good is a device running 24/7 if you can't access it when you're away? The ability to communicate with your Raspberry Pi over the internet opens up a world of possibilities.
Consider these scenarios:
- Home Automation: Adjust smart lights, monitor security cameras, or control your thermostat from your smartphone, even when you're on vacation.
- Remote Monitoring: Set up environmental sensors in a greenhouse, a weather station in your backyard, or even a wildlife camera, and collect data from anywhere.
- Development & Testing: Access your development environment, run scripts, or test applications on your Pi without needing a physical monitor, keyboard, or mouse connected to it. This is especially useful for headless setups.
- Personal Cloud/Server: Host a personal cloud storage, a small website, or a media server accessible only to you and your trusted circle, without relying on commercial services.
- Educational Projects: For students and educators, remote access allows collaborative projects or remote debugging of code running on a shared Pi.
The convenience and flexibility offered by remote access are undeniable. It transforms your Raspberry Pi from a local gadget into a truly global resource, accessible from any device connected to the internet.
Fundamental Concepts for Internet Communication
Before diving into specific methods, it's crucial to understand the underlying principles that enable devices to communicate with your Raspberry Pi over the internet.
- IP Addresses: Every device connected to a network has an IP address. On your local network (e.g., at home), your Pi has a private IP address (like 192.168.1.100). To access it from the internet, you need to connect to your router's public IP address (which is assigned by your Internet Service Provider, or ISP).
- Port Forwarding: Your router acts as a gatekeeper between your local network and the internet. When you try to access your Pi from outside, the request hits your router's public IP address. Port forwarding tells your router to direct specific incoming traffic (on a certain "port") to a specific device (your Pi's private IP) on your local network. This is often the most complex part for beginners.
- Dynamic DNS (DDNS): Most home internet connections have dynamic public IP addresses, meaning they change periodically. This makes it hard to consistently connect to your Pi. DDNS services provide a stable hostname (like `myraspi.ddns.net`) that automatically updates to point to your current dynamic public IP address, ensuring you can always find your Pi.
- Security: Exposing any device directly to the internet carries risks. Understanding concepts like strong passwords, SSH key authentication, firewalls, and VPNs is vital to protect your Pi from unauthorized access. We'll explore these in detail.
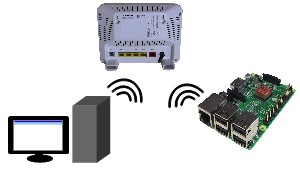
Direct & Local Network Connections: The Starting Point
Before you can communicate with your Raspberry Pi over the internet, you first need to establish a connection locally. This foundational step ensures your Pi is properly configured and accessible within your immediate network environment.
Connecting Via Ethernet or Wi-Fi
The very first step to getting your Raspberry Pi online, whether locally or for internet access, is to connect it to a network.
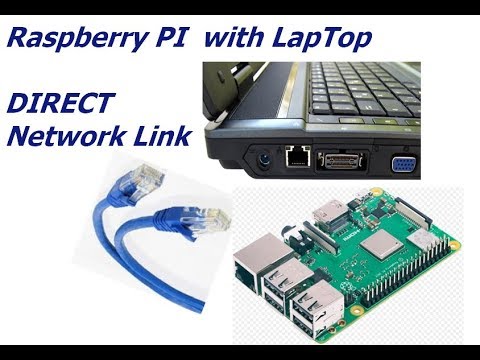
- Ethernet: As the saying goes, "Ethernet is easiest way to connect internet." For initial setup, or if your Pi will be stationary near your router, a direct Ethernet cable connection is robust and typically requires no configuration. By connecting to your Pi directly from your laptop or desktop with an Ethernet cable, you are bypassing your local network, and you aren’t sharing bandwidth with other computers on your network, which can be useful for direct debugging or file transfers.
- Wireless (Wi-Fi): "The second is wireless, using WiFi." Most modern Raspberry Pi models (like the new RPi4 which offers dual-band Wi-Fi) come with built-in Wi-Fi. You can configure Wi-Fi either through the graphical desktop interface (Raspberry Pi OS with Desktop) or via command line (for headless setups). This method offers flexibility in placement.
- Mobile Hotspots: In this comprehensive guide, we’ll walk you through 14 foolproof methods to get your Raspberry Pi connected—wired or wireless, GUI or command line, even via mobile hotspots. This is incredibly useful for portable projects or when traditional Wi-Fi is unavailable.
Once connected, your Pi will receive an IP address from your router. You can find this IP address using commands like `hostname -I` on the Pi itself.
Local Network Access (SSH & VNC Basics)
With your Pi connected to your local network, you can start communicating with it using its local IP address.
- SSH (Secure Shell): This is the go-to method for command-line access. It allows you to open a terminal session on your Pi from another computer on the same network. SSH is typically enabled by default on recent Raspberry Pi OS images, or can be easily activated. When you connect your Raspberry Pi to your network, other devices on the network can communicate with your computer using `
.local` or ` .lan` (using mDNS/Bonjour), which simplifies finding your Pi without needing its IP address. - VNC (Virtual Network Computing): For those who prefer a graphical interface, VNC allows you to see and control your Pi's desktop remotely. Getting started with VNC on Raspberry Pi is straightforward. It's like having a monitor, keyboard, and mouse directly connected to your Pi, but accessible from your laptop or desktop.
- XRDP: Similar to VNC, XRDP is another remote desktop protocol, often preferred by Windows users as it integrates well with Windows' built-in Remote Desktop Connection client. Solutions like TeamViewer, VNC, or XRDP can provide remote access to a Raspberry Pi over the network.
These local methods are the stepping stones. Once you're comfortable accessing your Pi on your home network, you're ready to extend that access to the wider internet.
Securely Communicating with Your Raspberry Pi Over the Internet
The real challenge and opportunity lie in extending your reach beyond your local network. To remotely control your Raspberry Pi from any device connected to the internet, you need to configure your network and Pi to allow external connections. This is where security becomes paramount.
SSH: The Command-Line Backbone
SSH is arguably the most fundamental and powerful way to communicate with your Raspberry Pi over the internet. It provides a secure, encrypted channel for command-line access.
To set up your Raspberry Pi for SSH access over the internet, follow these steps (conceptual):
- Connect Raspberry Pi to the internet: Ensure your Pi is online and has a local IP address.
- Enable SSH on your Pi: This is typically done via `raspi-config` or by creating an empty file named `ssh` in the boot partition of the SD card.
- Configure Port Forwarding on your Router: This is the critical step for internet access. You'll need to log into your router's administration panel and set up a rule to forward incoming traffic on a specific port (e.g., 2222, a non-standard port for security) to your Pi's local IP address on port 22 (the standard SSH port). Exposing SSH or VNC on your Raspberry Pi over the open internet directly is generally not recommended without strong security measures.
- Set up Dynamic DNS (DDNS): If your public IP address changes, a DDNS service will ensure you can always reach your Pi via a consistent hostname.
- Connect from outside: From your remote computer, use an SSH client (like PuTTY on Windows or the built-in terminal on Linux/macOS) to connect using your DDNS hostname and the forwarded port (e.g., `ssh pi@yourhostname.ddns.net -p 2222`). In this article, we will discuss one method of using SSH to remotely log into another computer from anywhere that you can access the internet.
For enhanced security, always use strong, unique passwords, and ideally, switch to SSH key-based authentication, which is far more secure than passwords.
VNC & XRDP: Graphical Desktop Control
While SSH is excellent for command-line tasks, sometimes you need the full graphical desktop experience to communicate with your Raspberry Pi over the internet. This is where VNC and XRDP come in.
- VNC (Virtual Network Computing): VNC allows you to view and interact with your Raspberry Pi's desktop environment as if you were sitting in front of it. You'll need to install a VNC server on your Pi (e.g., RealVNC Server, which often comes pre-installed on Raspberry Pi OS with Desktop) and a VNC client on your remote device. Similar to SSH, you would typically set up port forwarding on your router for the VNC port (usually 5900 or higher) to your Pi's local IP.
- XRDP: For Windows users, XRDP provides a native Remote Desktop Protocol experience. You install the XRDP package on your Pi, and then you can connect using the built-in Remote Desktop Connection client on Windows. Again, port forwarding (usually for port 3389) is required on your router.
Solutions like TeamViewer, VNC, or XRDP can provide remote access to a Raspberry Pi over the internet. While convenient, exposing these graphical interfaces directly to the internet via port forwarding can be a security risk if not properly secured. It's highly recommended to use these methods in conjunction with a VPN, as discussed next.
Leveraging VPNs for Enhanced Security
One of the most secure and recommended ways to communicate with your Raspberry Pi over the internet is by using a Virtual Private Network (VPN). A VPN creates an encrypted tunnel between your remote device and your home network, making it appear as if your remote device is physically present on your local network.
Instead of exposing individual services like SSH or VNC directly to the open internet via port forwarding, you only expose your VPN server. Once connected to the VPN, you can then access your Pi using its local IP address, just as if you were at home. This significantly reduces your attack surface.
You can set up a VPN server directly on your Raspberry Pi (using software like OpenVPN or WireGuard) or on your home router if it supports VPN server functionality. The process generally involves:
- Installing and configuring VPN server software on your Pi.
- Setting up port forwarding on your router for the VPN's specific port (e.g., UDP 1194 for OpenVPN).
- Installing a VPN client on your remote device (laptop, phone, etc.) and importing the configuration file from your Pi.
- Connecting to the VPN from your remote device. Once connected, you can then use SSH, VNC, or any other local service on your Pi without needing further port forwards.
Exposing SSH or VNC on your Raspberry Pi over the open internet, within a VPN, or using an external proxy is a critical distinction. A VPN provides a secure, encrypted tunnel, acting as a robust shield for your Pi's services. It is a secure remote access solution for Raspberry Pi OS, allowing you to connect to your Raspberry Pi desktop and command line with peace of mind.
Cloud-Based & Third-Party Remote Access Solutions
For those who prefer a simpler setup or face challenges with router configurations, several cloud-based and third-party services offer ways to communicate with your Raspberry Pi over the internet without direct port forwarding. These services typically work by having a client installed on your Pi that connects to their central server, which then acts as a relay for your remote connection.
Remote.it: Port-Forwarding Free Access
Remote.it is a popular solution that bypasses the need for complex port forwarding. With remote.it, you can access a Raspberry Pi remotely without port forwarding. You do this by accessing the remote.it server as a proxy, or by using remote.it’s software to form a direct peer-to-peer connection.
Here's how it generally works:
- Create an account on the remote.it website.
- Install the remote.it agent software on your Raspberry Pi.
- Register the services you want to access (e.g., SSH, VNC, HTTP) through the remote.it web interface.
- From your remote device, log into your remote.it account, and you'll see your registered Pi and its services. Clicking on a service will establish a connection through the remote.it network.
This method is incredibly user-friendly and ideal for situations where you don't have control over router settings (e.g., in dorms or corporate networks).
TeamViewer & Similar Services
TeamViewer is a well-known remote desktop solution that also offers a client for Raspberry Pi. Solutions like TeamViewer, VNC, or XRDP can provide remote access to a Raspberry Pi over the internet.
Similar to remote.it, TeamViewer works by connecting both the Pi and the remote device to a central TeamViewer server, which then mediates the connection. This eliminates the need for port forwarding and DDNS. While TeamViewer is widely used, ensure you understand its terms of service, especially for commercial use, as the free version is typically for personal use only. Other similar services exist, each with its own features and pricing models.
Adafruit's Web IDE & Custom Web Interfaces
Beyond direct desktop or command-line access, you might want to interact with specific applications or services running on your Pi via a web browser. "I use the Adafruit's web IDE to create and run my programs, and I'd like to access the web page with my Pi only connected to the internet." This highlights a common use case: running a web server on your Pi.
If you're developing a web application or have a web-based interface for your Pi project (like a home automation dashboard), you can host it directly on your Pi using web server software (e.g., Apache, Nginx). To access this from the internet, you would again use port forwarding (typically port 80 for HTTP or 443 for HTTPS) on your router, pointing to your Pi's local IP.
This method allows you to create a custom, user-friendly interface to communicate with your Raspberry Pi over the internet, tailored specifically to your project's needs. For security, always use HTTPS (SSL/TLS certificates) for web interfaces exposed to the internet.
Advanced Network Configurations & Considerations
Connect Raspberry Pi To Internet Through Laptop - Raspberry
Connect To Raspberry Pi Over Wifi – Raspberry
How to connect Raspberry PI to LAPTOP using Ethernet cable - YouTube
